|
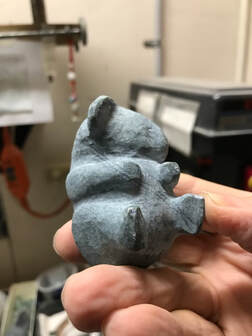
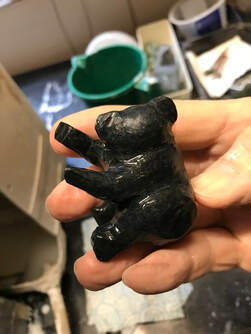
This will be brief because it’s becoming hard to tell you anything you don’t already know about animal carving! Following last month’s entry I decided to keep the koalas slightly rough and unpolished. This harks back to my “protest squirrel” mentioned elsewhere - whilst polishing shows off the quality of the stone and the abilities of the carver, I’m not one for glossy animals generally.
I ground off a few minor high points and rough patches on the first koala, found a few areas that needed some more attention and then ran the burr across the piece, leaving slight scratches in the direction the fur would have laid naturally. I made a final check that it was stable in its “tree” and adjusted the angle of the feet a little. I then attacked the block of stone (much harder than the first because it was completely recrystallized) to make the second koala, a very different design of a more mature animal (hence a smaller head in relation to the body size) and made sure it fitted in its tree one last time.
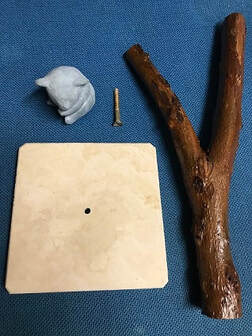
I then turned my attention to varnishing the pieces of wood and found it is difficult to find matt varnish these days. A pity – I’d have preferred to have finished them matt rather than with satin varnish. Oh well, you can’t have it all. I drilled a hole in the centre of the bottom of the wood to hang them upside-down whilst varnishing. And then it was time to consider the base: I’ve been carrying some offcuts of terrazzo floor tiles around since picking them out of a builder’s skip in Dublin more than ten years ago – I knew they’d be useful one day! The stone is very suitable for bases as it is squared-off and has a polished upper face. I rigged up my large blade and cut them as far as I could, but I didn’t have the side clearance in the splash box to cut the slab through completely, and was a little perplexed at what to do, until I thought, “Calcium carbonate is softer than steel!” So I used my hacksaw to finish off the cuts. Perfect! Next, I ground the three bases square on a coarse lap. I filed the bevels rather than grinding them on the lap – it is much easier to get the angle and regularity by hand for me than on a machine. It can look really shabby if the bevel is irregular and spoils the impression of a piece of work. I “drilled” out a central hole in each base using a range of burrs, cleaned them up and let the terrazzo dry before gluing on a piece of felt to each so the stone doesn’t scratch whatever it's placed on. It’s easier to glue on an oversized piece and then trim it afterwards than glue on a piece cut to size.
And with that, the first two koalas were finished, ready for dispatch to their future homes. I’m happy with the way they came together. I’ll complete the third, and almost certainly a fourth, in a little while – I’m “all koala’d out” at the moment and want to make some matau’s for a change!
So happy carving to you all!
0 Comments
|
AuthorOn this page I intend to add monthly updates on aspects of jade carving. I also plan to invite more experienced carvers to offer a "master-class" on a particular subject of their choice. With this I hope to enthuse both the novice and the expert in this ancient and beautiful art-form/craft. And comments are welcome! Archives
March 2024
Categories |
 RSS Feed