|
Phew, just made it this month! Warning: this month’s blog is about NOT carving. Shock, horror! Has Nigel lost his marbles? Well, maybe.
Life isn’t always quiet and ordered, and this last month has been a particularly busy one for a variety of reasons – though I’d stress for all the right ones. So, no, I haven’t caught one of the many variants of COVID (and I hope you haven’t either as it can be a really nasty illness) and I haven’t abandoned my workshop. I just haven’t had time to do as much carving as I’d like to, and there hasn’t been much worth capturing in pictures or words to pass on to you. Life happens! So, do I become frustrated when not carving? Yes, a little. And how do I manage that? I figure a happy and meaningful life is about making the right decisions. So, below is a list of how I weigh the various factors in my life, starting with the most important people or activities and going to the less important further down:
Life is about priorities. You have to decide what your own are, but at different times in your life some activities will rise in importance and fall again later. To quote the old proverb, “All work and no play makes Jack a dull boy”, so hopefully you can spread your time over several activities each day? But for the last few weeks I’ve rarely been relaxing in the workshop, sadly. Even when not there I often think about the pieces I’m carving, and about the pieces I’m going to carve. Sometimes I dream about them. I have a book stuffed with ideas on loose pieces of paper scrawled during my travels or occasionally on the pages themselves. Most will not see the light of day, but others are just awaiting that special piece of stone or opportunity. So all is not lost and I hope to have something to show you next month. Until then, stay calm and healthy, and I wish you happy carving!
0 Comments
Thanks to Greg for his query on grinding with laps.
To summarize:
Happy grinding! Thanks to those of you who sent me your queries - I’m getting through them as I have the time. And if you haven’t sent in your questions yet, please feel free! This month I want to talk about mass production in my workshop. Well, it doesn’t happen! I make batches instead.
If it takes longer to change the tools for the next stage of the process than it does to complete the current stage on the pieces in the batch, then it’s worth making a number of similar pieces: time is valuable and needs to be used wisely.
So when carving simple pendants which might take 1 – 2 hours to finish each one, I make batches of 8 – 10 at a time. But with more complicated pieces which might each take 15 – 20 hours to complete I have batches of 2 – 4 because if there are too many in the batch and I never seem to be making progress, it can drag me down mood-wise.
So what I’m saying is, it’s important to make progress during each work session. The progress makes me want to come back to do more in the afternoon, or the next day.
It’s all about planning. Happy carving! Hi there!
Maybe I'll regret this (!?) but you've put up with me telling you about carving for more than 4 years now, and maybe I missed some facet or only skimmed over a subject. So why not tell me what you want to know for a change? I'll do my best to answer every serious question, and I'll post the ones with more general interest on this blog in the coming months. Thanks in advance for your interest! Keep safe and keep carving! After a few quiet weeks caused by my point carver motor being re-wound, these last few have been busy in the workshop. The motor is going really well again! This just goes to support my oft-mentioned exhortation to keep your equipment in tip-top condition, because a breakdown can stop you in your tracks for weeks, especially in lockdown, as we are in Sydney at the moment (and we are not alone in Australia or the world). I reassembled my point carver, oiling and tightening a few parts as I went, and got to work happily. I started by trying to catch up with a few commissions – a very good place to start I thought! I had some bone-work to do, and after trying Kudu horn-inner for one piece, and finding it too soft and brittle for the design (it broke), needed to obtain some fresh beef bone for the work because I could not find the old beef thigh bone I carried around for years. It just goes to show – you should only throw-away things you will never, ever, need again! I can thoroughly recommend Steve Myhre’s book on bone carving (it’s listed in the references at the bottom of the About Jade page in this site) to give you all the information you need to know about cleaning and preparing bone for bone carving. It’s not a quick process though – I took me about a week to clean and de-grease mine.
An important point: once you have your bone cleaned and ready, you need to cut it the correct way to give you the thickest bone just where you need it for the design. Uncooked beef bone (the central section of either the fibula (lower leg) or tibia (thigh/upper leg bone)) are what you need for carving. I cut the first one the wrong way and dissected the thickest portion of the bone, which I needed for the design, so had to buy another and cut it correctly! Whilst that bone was soaking, I made a couple of trial pieces to test the design and techniques I wanted to use and was happy with the results.
However, whilst bone is softer than my more usual nephrite carving medium, great care needs to be taken in the grinding and polishing process. Every scratch needs to be ground out or the finish is spoilt. Similarly, any imperfections in the bone show up in a very negative way. You can’t do anything about the thickness of the bone – there is only the good, solid part to use. This then necessitated careful study of my piece of bone, much as I do with my stone, to find the best orientation for the design.
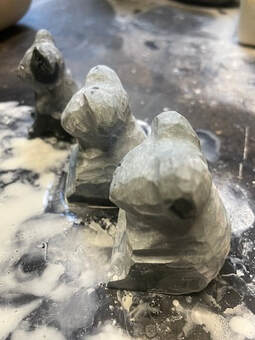
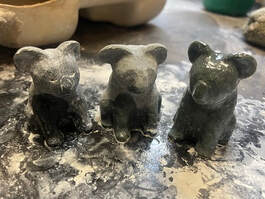
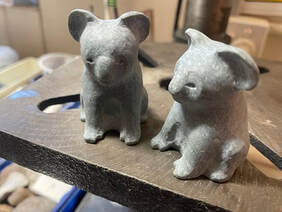
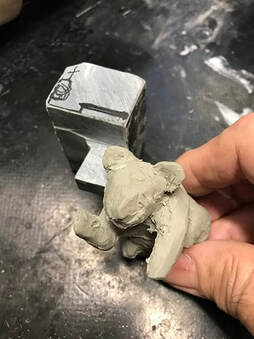
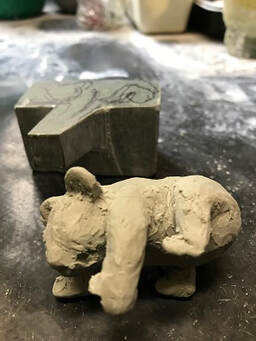
I’m taking a short break from bone carving and am happy to get back to carving nephrite to complete a small batch of koalas, one of which is increasingly becoming a bit of a rush job. I’m trying a new pose for the creature, and wasn’t sure how the head would relate to the shoulders, having only one picture of the koala in that position. So, as I often suggest, I made a model out of Plasteline/plasticine modelling clay. This will, I hope, prevent me from adding to the selection of “failures” at the back of the bench awaiting a new design to help them rise, Phoenix-like from the proverbial ashes!
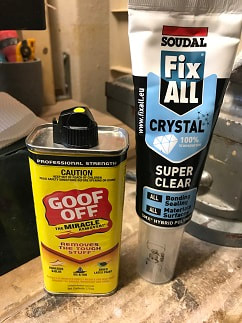
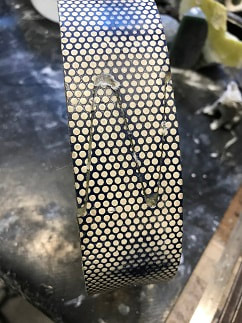
Happy carving! After last month’s tip you’ll be interested (hopefully!) to hear if the repair to my 1500 grit flexible diamond belt worked. The answer is yes, it did, not that I couldn’t do a better job next time if I need to (read on!). So how did I go about it? I went to my local hardware store and asked the solvents and adhesives expert there what to use. He suggested a product called “Goof Off” which cleaned up the tape and the belt nicely with a few applications and some firm rubbing. As directed by the safety instructions, I had plenty of ventilation whilst using it because of the acetone in the product and also used disposable rubber gloves as recommended by the manufacturers. Please read and follow the safety instructions for any and all chemical products!!
Once clean and dry, I used a product called “Fix All Crystal” which is both a sealant and adhesive, depending on how much you apply. I followed the instructions and then clamped the belt and tape between two pieces of thin plywood, having first wrapped the belt in a piece of paper kitchen towel to avoid things sticking to it. After 24 hours I opened everything up and cleaned off the stuck paper towel. I left it a further couple of days to harden before using.
The only problem was I didn’t push the fingers up into each other firmly enough, or else it slipped whilst clamping. But I then used the belt to finish a couple of jobs and it worked fine, so there must be a bit of latitude here.
Sometimes I feel like a guinea pig but the truth is we are all learning, and if you can learn off my efforts, then I’ve saved you some frustrations.
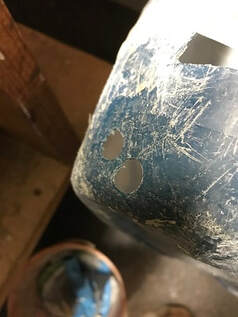
Happy polishing! It’s important to keep your equipment maintained and in good repair. Sure it’s inconvenient sometimes, but there’s no way around it in many cases. I was cutting the last slab of the day recently when I noticed there was a flood coming out of the splash box. I turned off the power and water and checked what was happening. I couldn’t find anything wrong except the drain hose was kinked slightly, and it went back to being like that after I straightened it. I got through the rest of the session by pinching it lightly the other way to keep it open. I cleaned the box after I’d finished, took it apart and thought about the problem. I don’t know why I drilled two holes in the box long ago! Maybe the one was too high, or I was thinking of adding a second hose if the first wasn’t sufficient for drainage? I don’t remember. But this is the first trouble I’ve had with it.
I thought about adding a snap-on hose fitting to the lower hole with strengthening washers either side of the box wall, and then clip on the hose whenever needed. That would stop the kinking in future. But having looked through various hardware stores, I couldn’t find any suitable fittings so I decided to simply cut-off the end of the hose, turn it around and fix it back into the box wall – it’s been fine for 19 years, so anything more elaborate is probably over-engineering the solution!
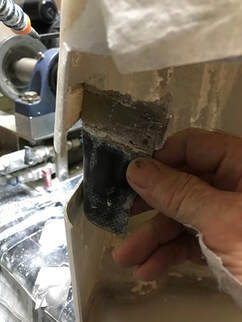
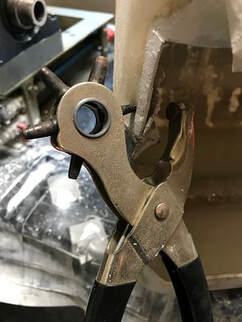
Whilst in the mood, I decided to fix the rubber splash-flap back as well – the glue had been going though it hasn’t been causing a problem, but I didn’t want it to get worse than it was. Again I had thoughts of making it more difficult to fix than necessary! After a while I came to the conclusion that the simplest way was to use my revolving head punch to cut the holes through the plastic box wall and rubber sheeting at the same time and then use a pop-rivet to secure them. It was the work of ten minutes to complete!
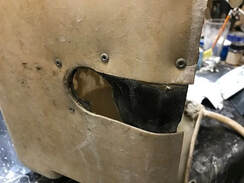
Unfortunately, as I was pre-polishing some slabs on a 1500 grit flexible diamond belt yesterday the glue gave way and the backing patch came off. With that the belt flew off the expandable drum, but at least the latter didn’t disintegrate as well!
Well, the glue has been good for many years so no complaints. I figure the best way to fix it is to clean off the glue and re-glue it – I’d be lucky to find a piece of fibrous backing tape that strong and thin anyway.
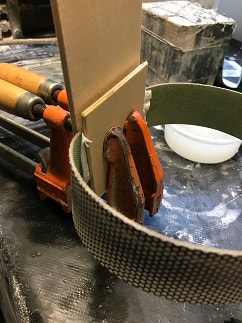
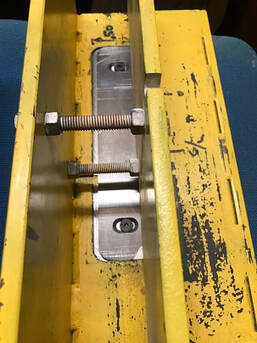
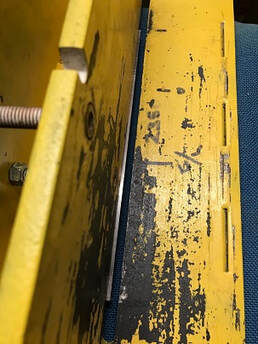
I’ve visited my local hardware shop and bought the materials I need to fix it and I’ll report on the outcome next month. Watch this space! Although it’s been some 10 years since I had the guide made for my slabbing saw, I became aware that my design was deficient in one area, brought home recently when the motor overheated whilst I was cutting some slabs. The problem was that any part of a slab which broke-off along a fracture during cutting anything thinner than about 6 mm could slip down the blade-slot recess in the base-plate and become wedged against the blade, increasing the drag and heating up the motor. On this occasion, I couldn’t see it as the remainder of the slab was still being cut. So a fix was necessary. I thought about it for a while and came up with the idea of a sliding plate, recessed into the guide base-plate, with transverse slots for the securing bolts, which had to be flush top and bottom to allow the slab thickness guide to slide across above, and the guide base plate itself to rest flush on the blade rest bed-plate below. Not knowing any local toolmakers or small engineering companies I approached the Men’s Shed which makes the lovely boxes I use for my work. They couldn’t help, but recommended another Men’s Shed with a metalworking capacity and a suitably qualified and experienced toolmaker. I visited by appointment and met the gentleman, John Kenney, and showed him the problem and the solution I’d come up with, and he set to work. The result is a beautiful job, and the attached pictures show it completed, but before I used it for the first time.
So after assembling the blade rest and slabbing guide, I can now slide the new plate across to close the gap between the edge of the blade slot and the blade itself to 1 mm or so, and know I’ll not lose any pieces of stone down the gap, or if I do they will be flung-off safely beneath the rest by the blade.
I hope the need for this modification with my equipment will alert anyone who is designing their own to use a narrower slot for the blade in the slabbing saw rest, which will then mean this modification isn’t necessary for them. And I now look forward to cutting many more, trouble-free, thin slabs in the future! Happy slabbing to you all!
This month I’m going to talk about having a reference model for your complicated carving subjects. It is always best to have a model to guide you. It can be a nice, full-sized model you have made up in Plasticine or modelling clay beforehand and ironed-out all the tricky parts, or it could be an accurate plastic model of about the correct size, if you can find one. Or, if all else fails, it could be a number of pictures of the proposed subject, but these are often problematic because you can’t find the correct angle of a suitable subject, or you are carving something original and there are no pictures of it on the web!
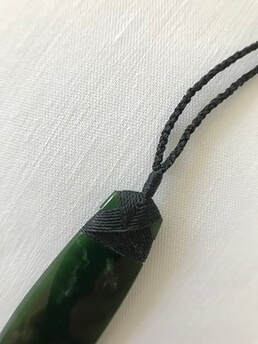
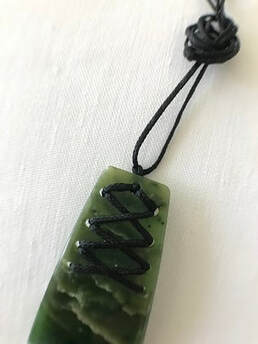
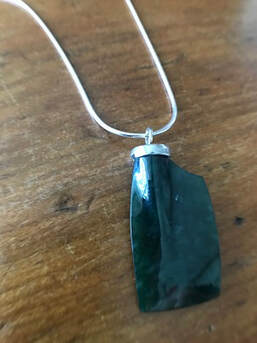
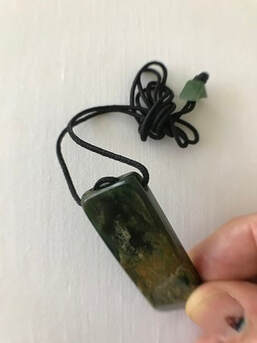
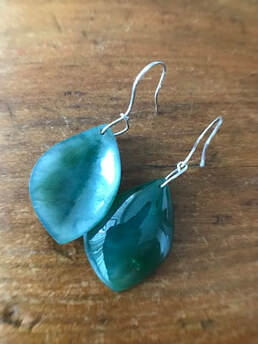
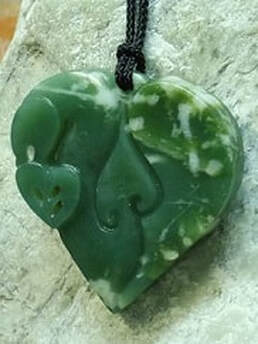
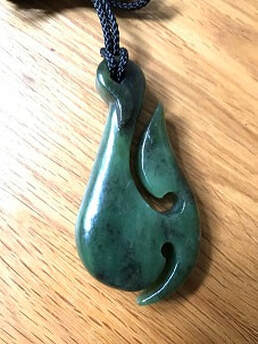
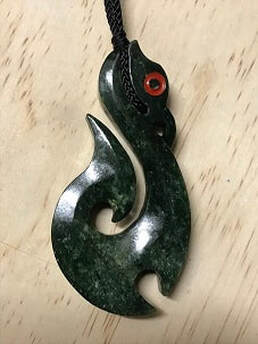
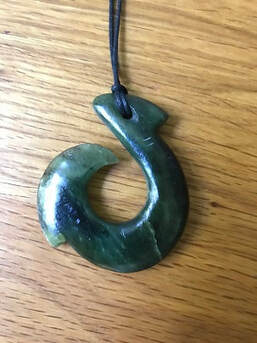
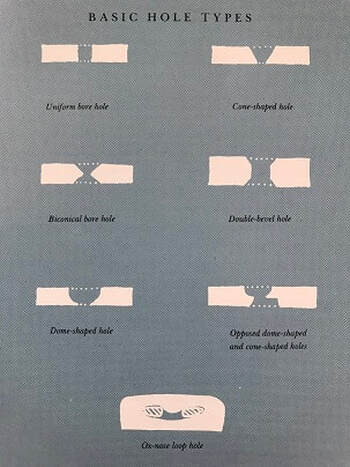
I’m sure everyone has tried to make something that didn’t quite go as planned and at some point you’ve decided to stop wasting your time and discarded the offending piece in the scrap box? I’ll gloss over my own! With a decent model you would have been less likely to have erred as far as that because you would have spotted any problems before they were terminal. So this month’s key words are: model, model, model! Happy carving! When talking about the eye of a piece it is not necessarily the same as discussing the hole by which it is hung. However, in much modern NZ carving the hole is often adorned by features reminiscent of an eye, and is located in the relevant place, but there are many instances where this is not true. I’ll give you some examples below. Firstly, where the piece does not have an eye …
And finally we get to making eyes in the stone …
So the ornamentation and variety of holes are almost limitless.
|
AuthorOn this page I intend to add monthly updates on aspects of jade carving. I also plan to invite more experienced carvers to offer a "master-class" on a particular subject of their choice. With this I hope to enthuse both the novice and the expert in this ancient and beautiful art-form/craft. And comments are welcome! Archives
May 2024
Categories |


 RSS Feed