|
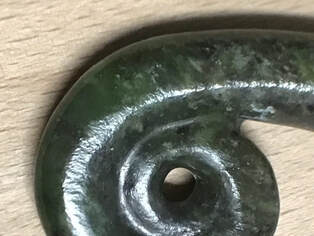
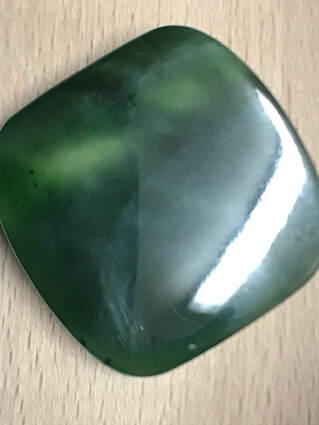
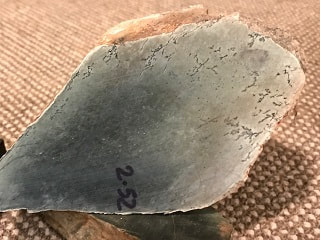
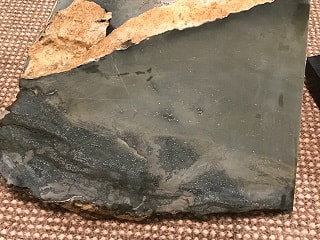
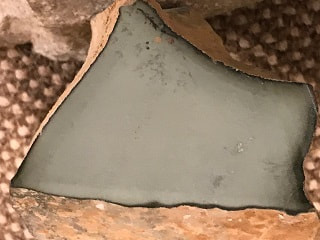
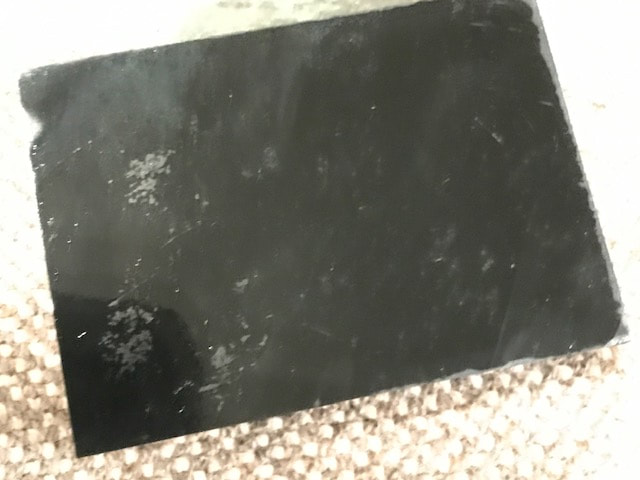
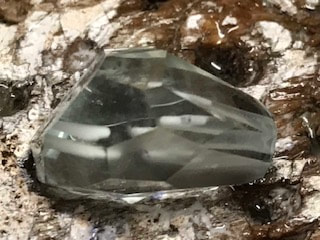
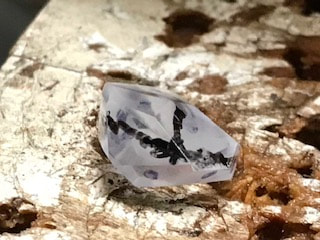
No two pieces of nephrite are the same. Most have a range of crystal sizes, and many have the variations across even small sections of stone. Only the best quality stone has an even, cryptocrystalline (very, very fine) texture throughout, and with no veins or fractures through it. That’s why some pieces of stone are more expensive than others. It’s generally the case that you get what you pay for. A piece of nephrite with coarse, or variable crystal sizes will never give a mirror finish across the whole piece, but you will be able to polish any finer crystalline areas to a high sheen. The variation can give character to a piece!
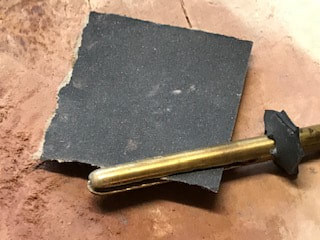
There are often clues found on the exterior of a piece of jade as to its interior texture and structure – you might see a vein for example. But let’s just stop here for a moment. What’s the difference between a vein and a fracture? A fracture is a crack in the rock. I’m not going to talk about “open” (unfilled) fractures here - you must plan your workpieces to avoid them, though superglue can sometimes help to stabilise a worrying, small fracture in late-stage finishing.
Fractures occur:
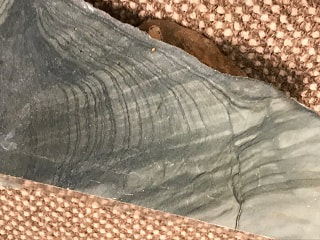
Some of these fractures fill with mineral-rich fluids in the ground, which deposit the mineral salts they carry and close the fracture – and those become the veins I’m talking about here. So, the mineralogy of the vein filling may be completely different to that of the jade, depending on the temperature and pressure of the rock and what minerals were mobilised by groundwater or geothermal fluids at the time. As a result they may be harder or softer than the host jade. So let’s get back to the piece of fictitious rough you are looking at. You may also see several sets of sub-parallel fractures defining the sides of the piece. These come-and-go, merge with other planes of fracture and/or define changes in the structure of the rock – possible hangovers from the original lithology of the piece before re/crystallisation began. You might see depositional features like traces of ancient algae or different crystal sizes representing different sized sedimentary grains, and even reflecting the different lithologies of the original sedimentary rock.
To see more subtle variations in crystal size you probably need to cut and slab your piece of rock. But to really find out the quality of the stone you may have to polish a face. If the crystal size is even across the face, you are onto a winner. It certainly makes carving easier. If there are more highly polished, raised veins you have a piece of rock with a bit of a history. Or there might be small, irregular areas protruding or sunken into the face by just a few microns after you’ve polished it, reflecting different hardnesses and chemical compositions for the two parts - the softer areas are undercut preferentially to the harder parts. It’s not the end of the world – just be aware of it when you design your piece or plan the finish. According to Len Gale in his book “Greenstone Carving, A skillbase of techniques and concepts” (published by Reed Publishing (NZ Ltd), pendants were historically only given a matt finish by Maori carvers, and there has been a renewed trend to leaving faces or entire pieces with a satin or matt finish over the last 20 years in NZ. I’ve found that leaving one face rough on a simple pendant creates interest and people snap them up. If however you want a mirror finish on the piece you need to be aware of the hardness variations in your rock and choose not just the right piece of stone for your work but the right part of the right piece.
Of course, you are most likely to only discover the variations once you get down to the final pre-polish stage of, say, 1000 grit. Life can be like that!
There are ways of dealing with undercutting of the softer material, like preferentially and carefully grinding the higher, harder areas, and then re-finishing the piece with a minimum of work. Or you can also rub it all down again and leave it with a satin finish which will hide the softer material, which often doesn’t take such a high polish. And one last point. A piece of semi-nephrite (a piece of stone not completely recrystallized as nephrite) will be likely to have parts of the original, precursor, rock remaining. These will have a different mineralogy to the areas which have melted and re/crystallized. They may pose difficulties, and may break more easily than the rest of the stone, so it will be worth using this rock for making chunkier pieces. Turn it to your advantage! So the next time you buy some jade, you need to look at not just the colouring, but every aspect of the rock, as the outside carries clues to what’s inside, and also how you should cut it, but that’s a different subject entirely!
0 Comments
The following piece is by Jeff Olliver of Olliver Geological Services Pty Ltd. He lives in South Australia (SA) and has a wealth of information and experience on the mineral resources of the state. I met him when I was in SA recently, and he kindly agreed to share some of his experience with us. His article follows. I'll post a few of my pictures of Cowell jade at the bottom of this month's blog. ................................... Jeff writes: despite the use and knowledge of jade more than several thousand years ago by other civilizations, there is no record of Australian Aboriginals using it. They used other stones like agate, quartzite and sandstone. Nephrite was discovered by Harry Schiller on his farm 20km north of Cowell South Australia. Harry was a mineral collector, prospector and an activist in local politics and government. He was intrigued by heavy green stones that he used to hold down fences that had been damaged by kangaroos. The specific gravity (SG) of these stones was 3.0 compared to normal rock at 2.5. In late 1965, on Harry's annual trip to Adelaide, he took several samples and showed them to the Adelaide Museum, which recommended that he go to the University of Adelaide. It was morning tea and Professors and staff were in the basement tearoom of the Mawson Laboratories, named after Sir Douglas Mawson, the famous Antarctic explorer. I studied for five years to be awarded a B.Sc, followed by B.Sc(Hons). The Schiller samples were handed around. Only one unidentified lecturer said "this is going to make you a lot of money, I think it's jade"! This was greeted by laughter because there was no known jade in Australia. Harry was advised to take the samples to the Department of Mines who forwarded them to Australian Mineral Development Laboratories (AMDEL). The subsequent petrological report confirmed the first record of nephrite in Australia. When Don Dunstan was Premier of South Australia in early 1974, he asked the Department to investigate and determine the quantity and quality of jade at Cowell. As Senior Geologist, Mineral Resources, I supervised the field work. Detailed mapping, sampling and drilling located 120 separate outcrops, the largest was 65m by 3m and the smallest 0.2m by 0.02m scattered over an area of 5km by 2km. This was designated the Cowell Jade Province. Lillian Jackson was the first lapidarist at the Kingston College of TAFE at O'Halloran Hill. She ran the jade jewellery and carving course for many years. ................................
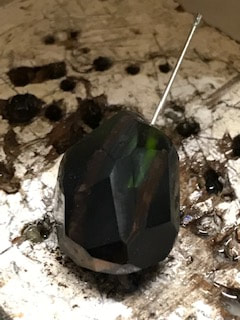
Do you know that the largest current reserves of top quality nephrite in the world are to be found in Australia? At Cowell in South Australia. Reserves of around 80,000 tonnes were estimated by the SA Department of Mines & Energy, now the SA Department for Energy & Mining (DEM) some years ago and have probably increased since! But currently, there is no market for Cowell nephrite in Australia and most people don’t even know jade is found here, though it is well appreciated overseas, especially the high quality Black Jade, which is startlingly beautiful. Yet there is a local market for other Australian minerals like opal and coloured Argyle diamonds, and my dream is to have jade pieces selling in every jewellers and tourist shop in the next decade where you can currently find either of the foregoing gems. Why not? I was told (Jeff Olliver, pers comm) that DEM used to provide a display of Cowell jade along with expert staff to answer questions at the Adelaide Festival of Arts. This ceased in recent times, no doubt when the previous owner of the exploration lease had problems and production stopped. To resurrect a local industry in SA I suggest the following:
An upsurge in interest in Cowell jade at home would likely encourage exploration investment, tourism, an awakening to the beauty of Australia’s mineral wealth, new jobs and skills in SA and an increase in the tax take by the state. So let’s make it happen together! But now back to my story. My stock of Cowell (bought in NZ many years ago) was running low, to the point where I didn’t have a suitable piece for a carving I wanted to produce for an exhibition in Sydney. So having previously met in Melbourne with a manager of the company which currently owns the mining lease (Cowell Jade Mining, a division of Gemstones Australia), the need for my wife to travel to South Australia for work was a great opportunity to visit, by arrangement, the company’s operations in Cowell.
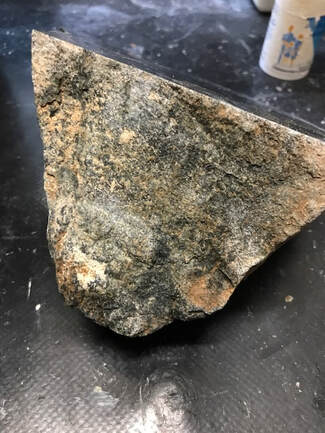
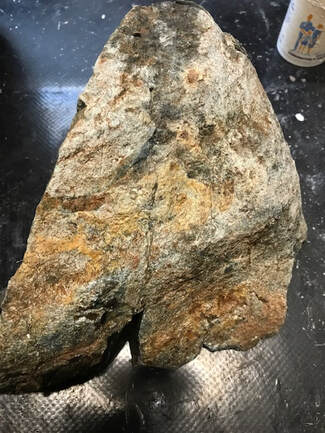
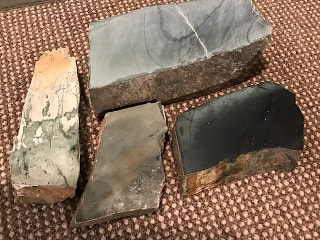
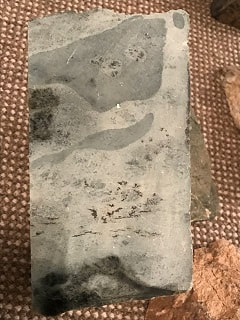
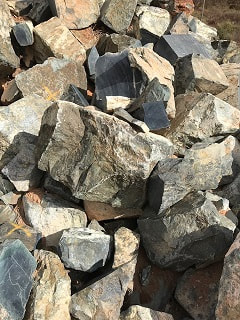
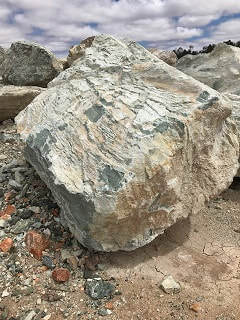
The company’s stock yard is a dream as you can see above! But most of the material is boulders weighing up to several tonnes, way too big for me to carry home, let alone cut and work. Also, with few cut and polished faces on the pieces of rough material it is really hard to tell exactly what I was buying, because I couldn’t tell:
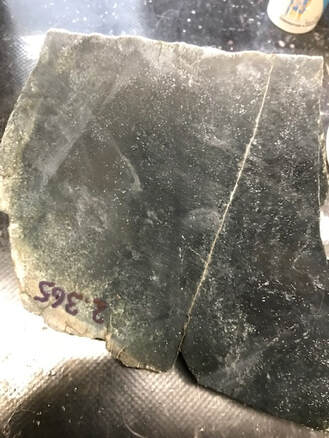
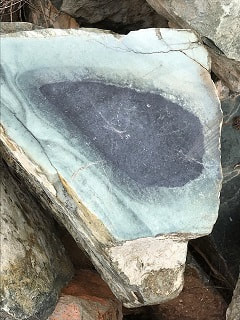
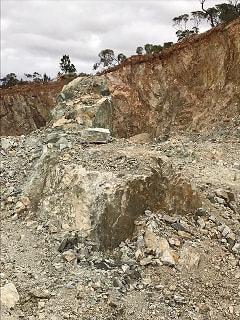
I was kindly directed to an area of the yard where much of the material had been cut and graded. Oh heaven!!! After deciding to purchase about 50 kg of the rocks there, I was kindly invited to visit a couple of the quarries with the manager. They were everything I hoped for! The geology of the area is tricky, but fascinating and the new company is working hard at understanding the factors and looking for high quality stone.
There are more than 100 outcrops of nephrite in the Cowell Jade Province. The host rocks are dolomitic marble and banded calc-silicates of the Palaeo- & Mesoproterozoic Minbie Gneiss, which is around 1.8 billion years old. The jade formed about 1.7 billion years ago, developing during cooling and folding/faulting of the host rocks (information gleaned from the DEM website).
I could bang on about the chemistry and other technical aspects of the province, but if you are interested I’m sure you will check them out for yourself.
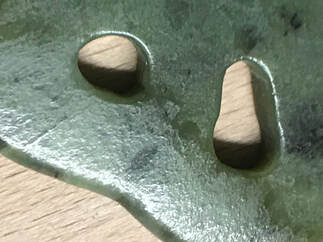
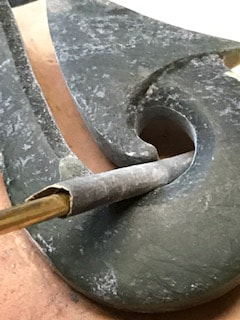
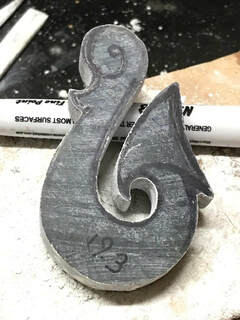
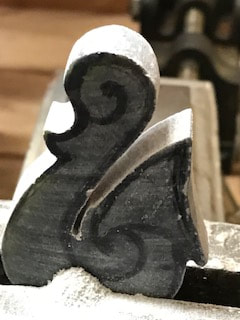
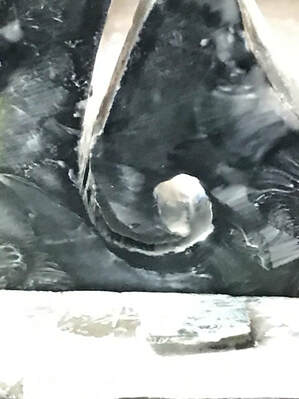
Only some of the lenses are being exploited because current demand is not that large, and the company has to remove a lot of very hard host rock to expose the elongated pods/lenses of jade, which might be high quality, or not. What can I say? I learned a lot and I am excited about getting to work on the jade in the near future. And a big thank you to Gemstones Australia for their kindness and help. I’m going to include further blogs on the Cowell Jade Province in future so watch this space! Following on from last month’s blog on diamond wire saw blades to cut through otherwise very hard to reach areas, the story continues here with cleaning up the cut faces of one of my recent pieces of work. The matau had a narrow slot through the curved mid-channel of the piece. I now had the choice to use a grinding wheel to open it out, or else a diamond file. In the event I decided to widen the slot with an abrasive wheel which neatly followed the saw cut, then use my 100 grit medium sized half-round file to follow the groove around the arc to clean up on one side and then the other. The circular culmination of the channel, the centre of the koru, needed a round file of the right size to clean it up.
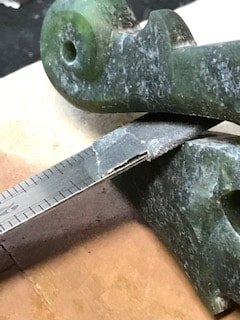
I used a mandrel with a piece of Wet & Dry paper (W&D) wrapped around it to sand the smaller radius curves down and remove the coarse tool marks from the files. I began with 240 grit paper and followed with 600 and finally 1000 grit paper. For the larger radius curves I used a sanding block wrapped in W&D by hand. I hesitate to show you the next picture as this is not what you are supposed to use a stainless steel rule for, but I didn’t press too hard and it worked very well in the situation with no damage to the rule! As a carver you will often need to improvise and there is everything to be said for it!
It came out quite neatly.
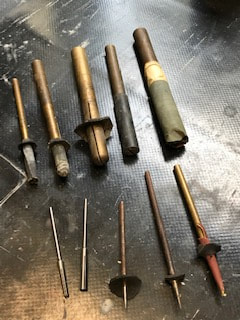
But let’s talk a bit about the different tools you can make up or buy to perform this task:
Most importantly, bearing in mind your electric drill or point carver normally turns to the right viewed from the body and looking towards the tip of the tool, you need to wrap the paper around in the right direction. A band of rubber is good to secure the outer edge of the paper
You can see the selection I use in the picture below.
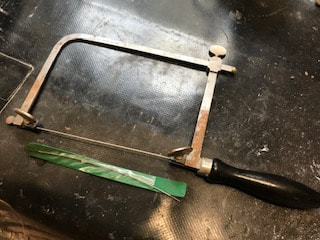
When sanding using power tools you need to keep your work cool to avoid overheating and the appearance of white flecks in the stone, so moisten the paper and work occasionally, and when it becomes dry again from the friction, dribble a few more drops of water onto the workface. The W&D is sufficiently robust to take it, and to form itself into the shape of the tool. If you have several turns of paper they will gradually wear away, but not before you complete most jobs. A final thought is to keep each mandrel tagged with the grain size of the W&D paper that is on it so you may be able to use it again for the next job. Happy sanding! I had a situation recently where I needed to cut a curved slot in a workpiece. I could have done it with dental burrs grinding out the slot, or drilled out several holes and then joined them up by grinding using dental burrs, but for neatness and time-saving I decided on using a couple of diamond wire saw blades I had bought years ago for some such suitable occasion. I mounted the wire blade at one end in an adjustable piercing saw frame, and tensioned the blade by leaning on the frame to compress it slightly against the edge of the workbench. I tightened the second clamp on the wire and was in business.
When sawing, I used long, even, slow cuts. Don’t press too hard. And make sure the blade is cool and wet, so wet the blade and cut every 5 – 10 seconds. If you don’t do it regularly you will wear out the blade very quickly. Then it’s a matter of guiding the blade along the middle of the “corridor”, which was clearly marked.
Once the cut had been made it was a simple thing to use it as a guide for cleaning up the faces of the workpiece but I'll show you that stage next month.
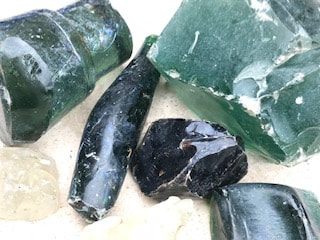
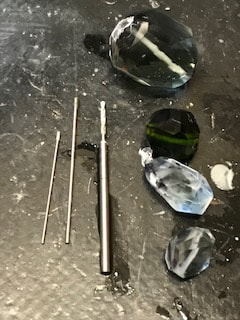
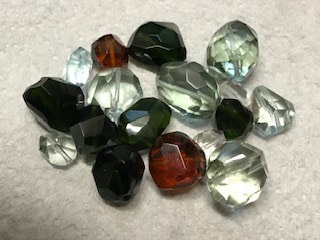
In 2007 I picked up some lumps of glass from the Matola City garbage dump for Maputo in Mozambique. They were colourless, green and brown, and seemed, from the colours and shapes, to be the ends of glass pours for bottles at the local Coke factory and brewery.
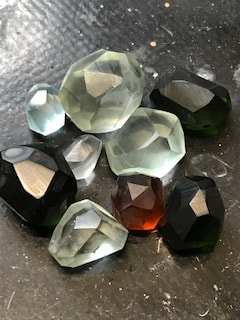
Picking it up is a story in itself. I was wandering around the bottom of the pit with an armful of lumps looking for “just one more piece” when I noticed my wife, standing near the car at the top of the slope, waving frantically at me … and then noticed a few men standing near her, wearing military fatigues, also waving, seemingly indicating I should head towards them with some urgency. This I did, rather grudgingly, I mean what could be the hurry? As I reached the bottom of the slope there was a large explosion behind me. I’d been only metres away from a pile of recently cleared landmines ready to be blown up. It’s wonderful what life throws up! Some years later I cut up some of the blocks and ground them into small spheres to be facetted and turned into beads. They then sat in a dish on my bench through at least two postings, until recently when I made the time to finish them. What I wanted was to make some irregular, free faceted beads in the form of polyhedra (solid, multi-faced figures) with nice, regular triangular or occasionally polygonal faces, all about the same size and with a reasonable angle between the faces. What could be difficult about that? Well, it started off easily, as I first used 120 grit Wet & Dry (W&D) paper on my lap with water to cool everything and prevent dust from coming off, with only the occasional loss of part of a fingernail. At the end of the grind I put a dot with a permanent marker on each facet and started to grind them with the 240 grit paper. I did this because when wet it was impossible to tell if the face had been ground or not. I went on to the 600 grit. No problems.
But when I went to 1000 grit paper, I noticed it was becoming increasingly difficult to grind the facets flat, and found it was really easy to come away with curved surfaces with irregular hinge lines between two faces, or else as I pressed the bead against the paper I couldn’t place it flat and would end up with another smaller face at a really shallow angle to the others. This happened especially when the W&D was worn. I tried using 800 W&D paper as a compromise but I had the same problem. One way around this problem was to change the paper earlier to avoid it becoming too worn. Of course, at every new face and every correction the beads became smaller with some down to the size of a large pea.
I eventually managed to produce a reasonable set of facets and a good finish on the beads with 1000 grit paper. Then I had to drill the holes. I had three options available to me:
I started with the method 2 above, and they were wonderful! They were long and rigid and drilled the glass quickly. But after only a few holes the end of one twisted off and I had a lot of fun in drilling the other part of the hole to be able to push out the tip. A few holes later and a second one lost a diamond and ruined the tip. So that ended my efforts with method 2. I tried using the diamond-tipped drills, method 3, but they were very flexible, and couldn’t be steered in the glass and I couldn’t rotate them to widen the hole.
So I went back to the tried-and-trusted method number 1! I quickly realised I needed to drill almost all the way through from one side and only then drill in from the other end so as to avoid misdirected holes not meeting. This was because the refracted images of the hole made it difficult to tell where it was heading, so with the one deep hole, it was easy to put a spare drill in the hole and use a permanent marker to draw the line of the hole around to the other end with two or more “segment” lines, and where they intersected I started to drill the second hole.
This was successful, and I had no problems joining up the two holes. Where the bead was too large for the dental burrs to reach, I used the diamond-tipped drills to extend them and to join in the middle. Any slight misalignment of the holes was corrected when I cleaned out and enlarged the holes afterwards.
And so to the polishing: I used my hard felt disk with 14 k diamond grit and the faces came up beautifully with a minimum of effort. A few faces showed failures in my technique that were not apparent before. These will be reground with 1000 W&D and then re-polished the next time I have the right equipment out. So will I go through this process again? If I need a particular shape and size of bead, yes, but as a general rule, the time and consumables I used to make the batch were far in excess of the value of the beads I produced. It was an interesting exercise though.
This month's tips are about the quality of a piece of work.
Enjoy! Even if you only have one piece of stone to use you still have a few questions to consider before beginning to carve your design. Questions like the following:
Once you have more than one piece of stone, you need to ask yourself a few more questions before you decide which to use:
You have to decide what the answers are to all of these questions! There is a lot to be said for trial and error though – you learn from making mistakes. Not all stone can be cut in any direction: I suppose everyone has cut a slab and it has broken because they were cutting across the planes of weakness/fractures in the rock? You hopefully won’t do that again! So answer the questions, plan your piece and get to it! The subject of this months quick tips is hole drilling. I hope you find the points of use.
|
AuthorOn this page I intend to add monthly updates on aspects of jade carving. I also plan to invite more experienced carvers to offer a "master-class" on a particular subject of their choice. With this I hope to enthuse both the novice and the expert in this ancient and beautiful art-form/craft. And comments are welcome! Archives
May 2024
Categories |

 RSS Feed