|
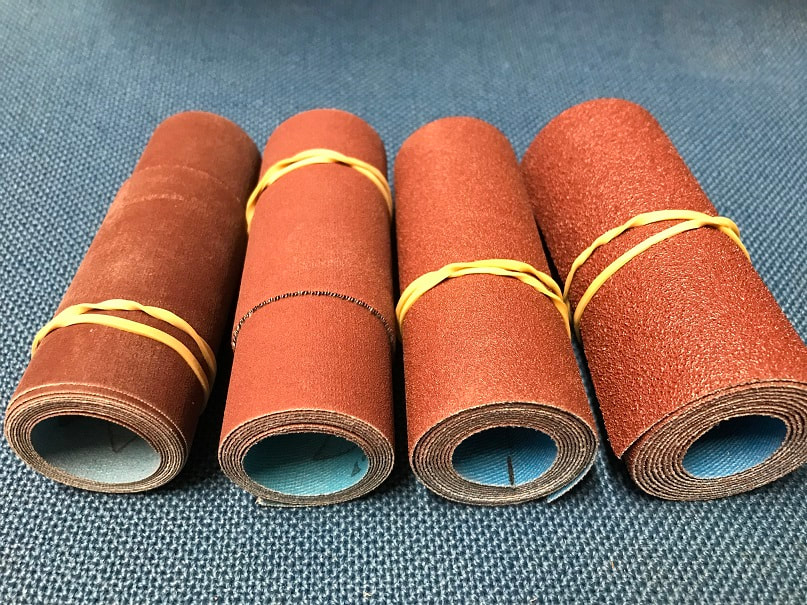
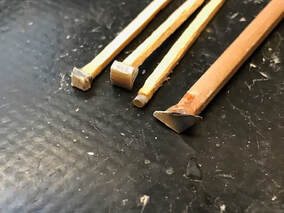
To produce rings, the easiest and most accurate method is to begin with a core bit which is just a mm or two smaller than the required inside diameter of the ring. You core out the centre/hole and then remove the ring from the piece of stone, either with another core bit a couple of mm over the finished size you want, or with your trim blade.
After that you grind out the inside to close to the final diameter, using your Vernier Caliper to make sure you don’t go too far, and then grind down the outside so the ring is neither too thick nor too thin. The only way to define what is the right thickness is experience, aka trial and error – too thick and they are uncomfortable to wear and too thin and they will break easily. When grinding out the inside of a ring, near enough isn’t good enough. The required internal diameter was 20.68 mm and a steel rule just doesn’t cut the mustard. I used my Vernier Caliper, which is accurate to 0.2 mm to measure the hole in many directions.
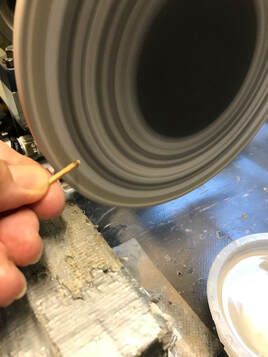
But how to grind out the centre hole to such an exact size? Having thought of using mini-expanding drums with spiral diamond bands, and discarded the idea because they were too coarse, and diamond files because they would be too inaccurate (the hole needs to be as close to circular as possible), I finally decided on using a ½” sanding mandrel which had a slit in it for the end of the paper. This was mounted in my point carver chuck.
I decided on 600 grit Wet & Dry (W&D) paper which would give me a slow grind as I rotated the rings across the paper. And of course there was a slow drip of water on the work to stop it getting hot. I had to do some additional filing to remove the harder spots in the rock, then went up through the finer grades of W&D until it was polished. They came up well.
The sanding mandrels can easily be overlooked when carving but they certainly pull their weight at times like this!
0 Comments
As a carver making pieces through the subtractive art process you need patience. The stone will only let you work it at its own pace. Push it and you’ll break something, go too far or cause excessive wear to your tools and equipment. There are few short-cuts!
But whilst computers allow better and better layout for documents and drawings to finer tolerances, it is difficult for us to come up with perfection every time. This doesn’t make us old-fashioned! You’ll improve with practice but strive for perfection in your work every time. Below are some suggestions towards improving the neatness of your work:
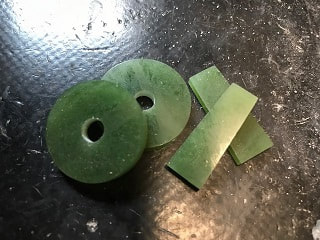
And then there is balance, which can be looked at in two ways: a piece has to look good as well as hang correctly. So spend time making a beautiful-looking design, and then make it sing! Follow the old adage, “slow but sure”, stay alert and you will be unlikely to have too many rejects. Happy carving! I had a recent commission from a friend to make four nephrite pieces: two fairly small bi’s and two small pendants. It was certainly within my abilities, but it’s been a while since I carved pieces of this size and frankly, getting everything just right proved to be less easy than I remembered. The friend asked for the bi’s to be 3 mm thick, and with a particular sized hole in the centre. Having found a suitable piece of stone for them all, I slabbed it and trimmed out the four pieces. The holes were a breeze! But grinding down the slabs to the correct thickness proved a bit of a slog. I was reminded (!) that I needed to be very careful not to grind down my fingernails.
I went through many sheets of Wet & Dry paper at 100, 240 and especially 600 grit. As I did so I played with the parameters – pressure as light as possible, the right amount of water to keep everything cool, turning the pieces regularly and using the whole width of the paper on the laps to make them last as long as possible and keep the price down. It took much longer than I expected! Very often during the process of thinning down the slabs the pieces became slightly wedge-shaped, which needed to be corrected by exerting pressure on one part to get the faces parallel again.
Then I had the task of grinding down the edges at right-angles to the front and back faces. So often, as I turned the pieces I’d introduce a slight angle through uneven pressure and off it would go again in one plane or the other, causing me to have to correct and re-grind them at the correct angle. The important thing was to get the angles right just before I hit the required sizes. No pressure! But eventually, and with some relief, I got them to just a bit over the required thicknesses, and the pre-polishing and polishing went like a dream. I enjoyed the opportunity to make some “simple” pieces again, but hopefully with greater ease, in less time and with a finesse that was previously lacking. The morals to this insignificant story are:
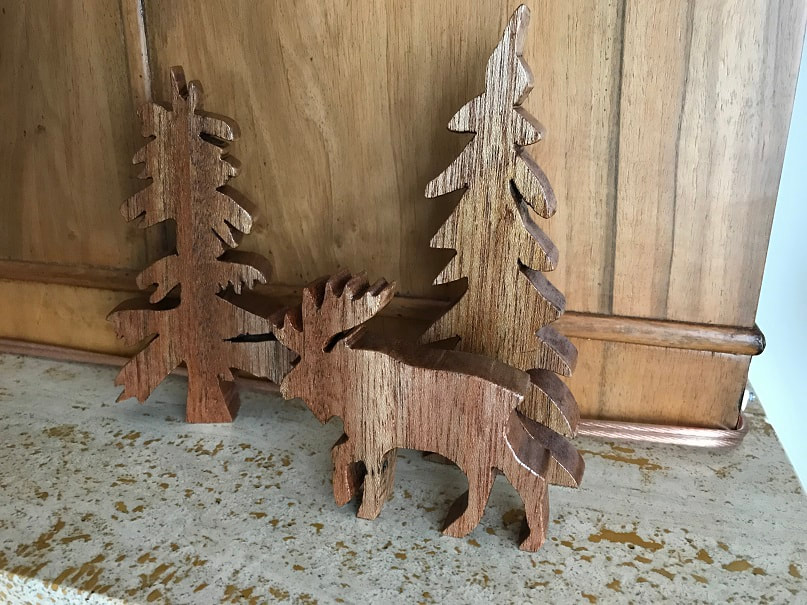 The picture this month is of yet more items I needed to replace from our move back to Australia (the originals came from Canada and were made of pine bark and wood and could not be brought in). These are loose representations of the originals and duly took their place as extras in my wife’s Nativity scene a few days ago.
I enjoyed creating the trees in a Group of Seven style (seven Canadian artists who broke away from the practice of painting Canadian trees and landscapes to look like those in England in the early 20th Century, utilising a really bold colour palette and often strong brush strokes). Having missed Christmas with this post, at least I am not too late to wish you a happy, healthy and peaceful New Year, and hope you will make much progress with your carving in 2020. In my July 2019 blog on Paua inserts I mentioned using epoxy glue to stick the pieces of shell to dopsticks. I also wrote that I’d not found any suitable sealing wax for my purposes and would like to try it. Then I came across a company in Melbourne (Kustom Haus) which offered “Traditional” (ie brittle) wax which suited my needs. They also sell modern, rubbery stuff, which is no use to me.
The company supplies small sticks of wax which have wicks to aid the melting, a bit of a luxury really, but I wanted to try out the technology before recommending it. Since then, whilst nosing around on the internet I see it is possible to find blocks of dopping wax, and I will look into that at some stage.
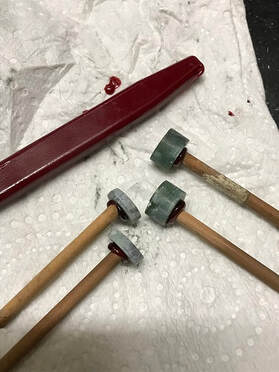
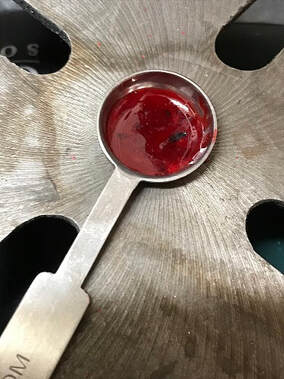
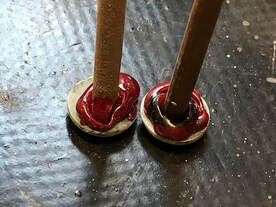
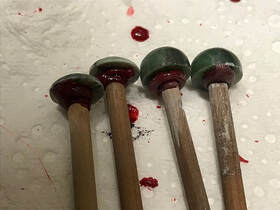
One extra piece of equipment I bought from Kustom Haus was a small melting spoon. I collected all the drips and pieces of used wax off the dopsticks and melted it down in the spoon. To achieve this I used a small gas lighter underneath the stainless steel spoon and the wax melted in a minute or two. Then I dipped the end of the stick in the liquid wax, got it to the right shape and size of blob (sorry, I have to use technical jargon occasionally) and stuck it to the piece of stone or shell.
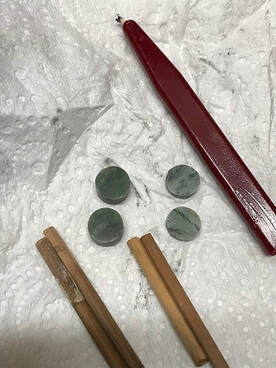
The theory is pretty simple – to avoid grinding away your nails and burning your fingers on a small piece of work, you stick the stone or shell to a piece of dowelling, match or tooth-pick using the sealing wax. You can then roll the stick between your fingers for a regular curved finish, or shape the work however you like. Depending on the stone or shell, you might not need to use 240 grit Wet & Dry on your lap, but only begin at 600, and go to 1000. Some people add a lot of wax to their dopsticks to better hold the work. That’s up to you.
The main benefit to using sealing wax over epoxy is that when the workpiece falls off the dop you don’t have to wait for the glue to harden before getting back to work. You can just heat up the wax on the dopstick slightly, make sure the work is dry and warm (some people warm their workpieces slightly to make a better bond), and stick them together again. And off you go! A few reminders to save you some time:
And that is about it. It’s that simple!
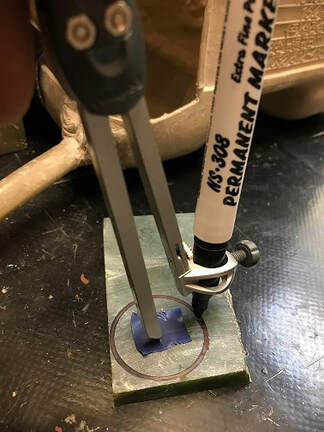
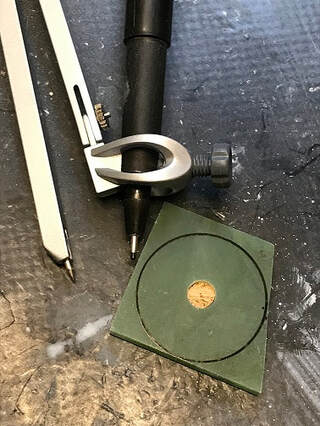
This month I’ll give you a few tips on marking out circles on rock. Firstly, you’ll need a compass with an attachment to hold pens. They are inexpensive and available from most stationers. Take the dry, grease-free, smooth-faced slab of stone you want to mark the circle on. Stick a piece of masking or electrical tape on the rock in the approximate centre so you can place the compass point on it and it won’t slip. Then jiggle the tip around until you get the best fit for the circle.
Mark the circle with a permanent spirit marker. Test the marker first and see if it washes off easily – some “permanent” markers work on clothing and paper but will wash off as you work the stone. So make sure you use one that is fit for purpose. If you are removing the centre of the circle, this can easily be achieved with a core bit or grinding it out with burrs. Now, having done this, the hole is quite likely to not be perfectly central in the circle any more, so sand down the face and having temporarily plugged the hole with a small piece of dowelling, remark it.
And off you go! You can remove the excess stone with your trim saw, by grinding it off using a coarse lap, or coarse belt for your expandable drum sander. Easy!
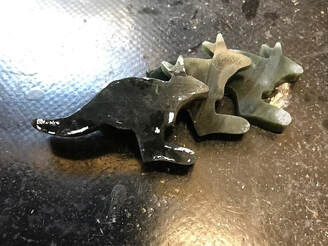
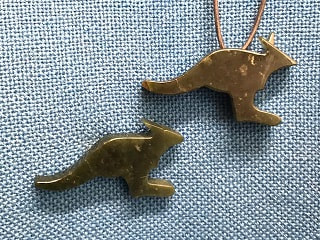
Enjoy!! I’ve been planning to carve more Aussie icons for a long time but following my acquisition of some lovely Cowell from the mine on the Eyre Peninsula in February, and my desire to increase the local market for nephrite to help both Aussie carvers including myself, and the mine’s owners, I had a strong reason to finally do something about it. Enter my kangaroos. I began by drawing a 'roo on paper and cutting it out as a stencil. I marked the chosen piece of stone with the outline with a spirit marker. I then cut out the small block of Cowell, marked the outline on both front and back faces and trimmed it to the outline as close as I dared with power tools. At some point I became fed-up with having to re-ink the outline and decided to use paint instead. This conveniently helped to preserve the stencil as well as being much easier to see when the stone was wet – I used white paint.
Then it was down to diamond files to make sure the edges were square between the front and back faces and not rounded. It’s good to use a file card to clean out the rock flour from between the diamonds because it grinds more quickly. Once I had the shape I wanted, I used the trim-saw blade to slit the block into two thin ‘roos and a thicker one (the block wasn’t quite thick enough for four thin ones unfortunately).
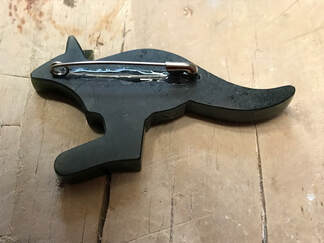
I sanded down the flat faces on my laps with 120 grit and going through 240 to 600. I cleaned up the edges with diamond files at 100 and 240, and then used grinding sticks for 600 and 1000. On tight corners I used the Emery paper as discussed in last month’s blog and Wet & Dry as well. I cleaned up the faces with 1000 grit paper on a lap and then continued with 6000 grinding sticks and 50,000 grit diamond polishing paste on my leather polishing wheel. They took longer than I expected I admit, but hey, we live and learn don’t we? How to mount them, I pondered? The thick piece deserved a good cord and I drilled two intersecting holes in the top of the stone to give a wide and stable mounting so it doesn’t swing around too much. The thinner kangaroos I decided would be brooches, and needed a strong pin mounted in the back as they are quite heavy. I thought about using sterling silver wire, but found it was either too thin and flexible, or too thick and would damage the clothing the brooch was attached to. So I thought, go simple, and used a 33 mm long safety pin, mounted in an epoxy glue-filled slot cut in the back face of the piece.
So there is one idea for you. There are many other Aussie icons suitable for turning into pendants, brooches, earrings and so on. And don’t our Aussie customers deserve to wear something Australian? Start your engines, carvers!!
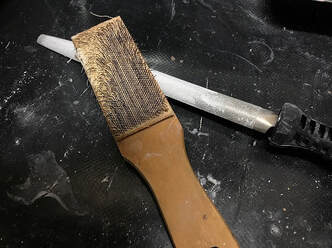
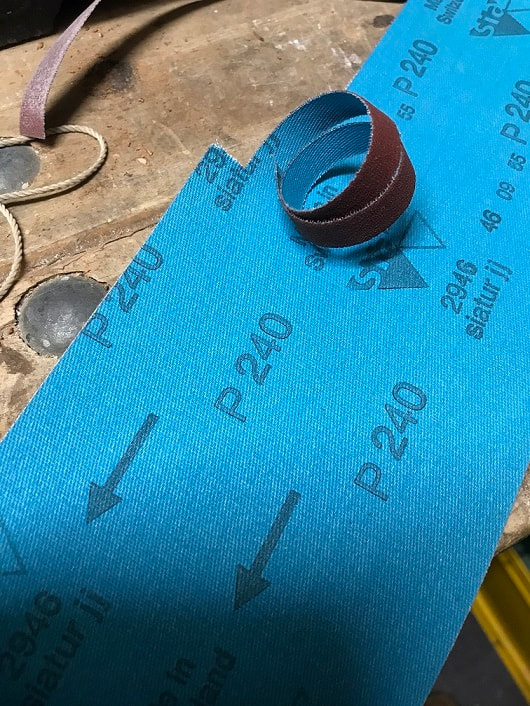
This month’s tip involves the use of Emery paper. A very good product it is too as it can save you time and money over other techniques! I saw this idea when visiting Hokitika recently and appreciated its genius, and simplicity. Why hadn’t I thought of it myself? Don’t answer that! Emery paper is a very tough cloth-backed “sandpaper” and comes in long rolls or sheets. Apart from normal use, it is designed to be used on belt sanding machines, so has a direction arrow on the backing, but for hand sanding that isn’t a concern. I bought it in four grades – 60, 120, 240 and 600 grit. You can also buy it in much finer grades but they are of diminishing use to us. It is a perfect product to use to open up or smooth the edges of holes from around 10 mm diameter in a piece of work which would otherwise be tricky to clean up, a concave embayment in your design, or edges in general. You can also make a round hole oval if want. All you need is clearance to be able to draw the paper across the face.
As you can see from the picture below, you can tear off thin strips in whatever length you want and use them to sand down your work.
Below is a piece I’ve recently been working on. I gripped it loosely in the aluminium-lined jaws of my engineers vice, held each end of the paper and pulled it backwards and forwards across the work until the grit was worn off. The centre section of the Emery will usually wear our first so after that you can use the less worn sections at each end. The paper becomes clogged with rock flour after a short time, so you can use a file card or even a stiff hand brush to clean it to extend the life of the paper. I guess rinsing it under a tap could also help but I haven’t tried that yet. Because of the downward pressure you exert on the work you will produce a slightly convex surface, and bevel the sharp edges as well, which can be an advantage.
I tried two methods of cleaning up the edges of similar pieces of work from the 120 to 600 grit stages. On the first I used 100 and 220 diamond files, followed by 240 and then 600 grinding sticks. On the second piece I used the 100 and 220 diamond files, followed by 240 and then 600 Emery paper. In both cases I also used 600 grit Wet & Dry paper to clean up small areas where tool marks stubbornly refused to wear away. If stone can be stubborn?!
I found the second method was quicker, and cheaper on materials as well. So I hope you’ll give this technique a try – it’s well worth the small investment, and can be an effective way to get some “grunt” on a rough edge which is hard to otherwise reach. Happy grinding! I didn't get to where I needed to be with my latest work to write it up this month so I'll give it to you next month. So we're back to "Quick tips" for now.
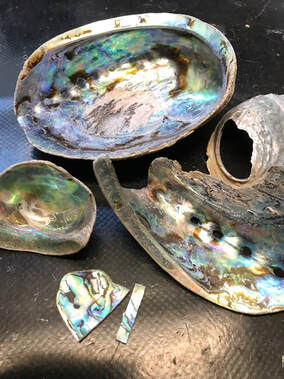
That's it for now. Happy carving! Paua or abalone shell is a beautiful material to use for highlighting eyes or other details in carvings. Picking up empty shells off the beach is OK. Picking live paua off rocks is not. NZ and Australia have strict rules on the harvesting of them, so please be aware and sensitive to the delicate environment we live in!
The colours of paua may fade over time in sunlight, so the strongest colours may be found on the outer, convex side of the “mother of pearl”, under the cream-coloured surface layer of the shell if it has been on the beach for a while. Grind or file it off to find out. Prepare the cavity in the workpiece with an inverted cone-shaped dental burr to produce a flat bottom to the hole and slightly undercut sides which provide a solid key for the insert when glued. In times past, Maori carvers used sealing wax – and there is no reason why you shouldn’t too if you can find some.
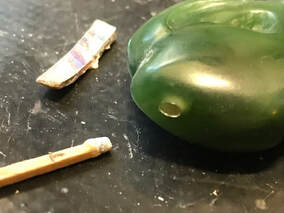
Once you know the size of the cavity you need to fill, you can cut your shell with a very fine toothed razor saw, sand it flat if needs be (not usually needed), glue the surface you want to be seen when finished to a dop stick (made of fine dowelling or a matchstick) with epoxy glue, leave until it is dry/hard and then start to grind it to size. Try not to inhale the dust – it smells like you are at the dentist having a tooth drilled and is not very pleasant, and potentially dangerous if you inhale lots, so if in doubt wear a mask.
Because the inserts drop off every so often during grinding due to the sideways loading on them, you might want to prepare more than you need and see which you use in the end. It also means if one drops on the floor and you lose it you don’t have to start again from scratch.
You can grind them on a slowly rotating lap using 600 – 1000 grit paper. Use only very light pressure. And keep the piece cool by regularly dipping it in water because above approximately 80˚C the epoxy breaks down and your small piece of paua is going to go spinning off somewhere. So you should wear glasses to protect your eyes just in case. You can also use fine diamond files for the final grinding to size - or whichever method gives you less sideways pressure to break the glue bond. When it is the correct size, test fit it the right way up and make sure it is not proud of the surface of the piece. Mix your epoxy and fill the hole. If the insert is a little thin, you can use a pad of glue to raise it. Squeeze in the insert and clean up any excess glue. Leave to harden before polishing. If the insert ends up proud of the surface, grind it down with very fine files or Wet & Dry Paper and see if the colour at that level is still satisfactory – it should be. Otherwise, drill it out and start again. The effect is worth it in the end!
|
AuthorOn this page I intend to add monthly updates on aspects of jade carving. I also plan to invite more experienced carvers to offer a "master-class" on a particular subject of their choice. With this I hope to enthuse both the novice and the expert in this ancient and beautiful art-form/craft. And comments are welcome! Archives
May 2024
Categories |


 RSS Feed